Monday, January 20, 2014

Dip it baby...

Ever since i got the car, it always bugged me that the outer door panels looks a bite worn out, well to me its extremely warned out!

As you can see from the picture below how unhappy i am but what to do...the car has aged and the rubbers with Malaysia heat will not last. After a closer inspection, the rubbers are still doing its job but ecstatically my eyes is tearing blood!
Passenger triangle window
Passenger side
So after many, many and many sleepless nights, i thought i will give it a paint job. Sand it smooth and a nice coat of matte black. Obviously this is a cheaper solution. So first thing was to prep the car. Now with paint masking is very important otherwise all the over spray will be visible. 

Little did i know, masking is not easy! Its freaking hard, especially for a person like me who keeps peeling it off and doing it again, until its perfectly aligned. It took my close to 4 hours to mask just the rear passenger door. 1 door that is. I was tired and my back was killing me, so i called it a day and thought i will just finish it up next weekend. So the car was parked at my usual place protected from the nasty sun and rain, but one of the days, it had rained so bad with strong winds, and my whole car was wet!! Arghh which means all my masking with newspaper and masking tape is ruined!!! Had to feel all of them off, otherwise when wet newspaper dries up, it will be an even bigger mess to clean up the car.

So i thought there got to be a better solution. Recently this new rubberized based paint was getting very popular from US. PLASTI DIP! After watching numerous videos on YouTube, i thought to my self, this is for sure the tool for the job. Rubber for rubber. 

I headed on to ACE Hardware, got a minor heart attack to know that its RM 50 per can! Calmed down and still bought a tin.


So how it works is that this paint, once applied we can easily peel off the over spray so masking is not really required.. and i am a happy guy...below pictures will tell you more..


1st coat if im not mistaken

3rd or 4th coat

Close up look at the wet paint...yes its not a good job

5th and final coat

Final coat

You can see the difference between left and right, where on the right i have peeled off the over spray. It comes off beautifully but it is a bitch to peel

After hours of peeling it off

End results..not bad ehh..

End Results


Overall i think i did not a bad job, but i will need to redo it again sometime. Lesson here is for it to easily peel off you need to ensure the over spay is thick enough, which means i will need at least 2 cans and not 1. Also please mask off the areas where you do not want the paint to reach! I used about 40 minutes to paints the 5 layers, the waiting time in between was about 5 - 10 minutes, but it took me about 2 - 3 hours to peel off the over spray because they were all over and they were so thin that i had to rub it off!

But in a nut shell Plasti Dip is AWESOMEEEEE

Saturday, January 18, 2014

Out of juice

This happened about a week ago. The night before my place had no electric, but since I was dropped dead tired and thinking about my meeting the next day...I still slept like a baby.

Got up in the morning all fresh and ready for the job. Put on my well pressed shirt and pants, decided to drive as the bike just gets my clothes all crumpled, got down kept all my stuff in the car...and turn in the ignition but the car does not want to crank. I got panicked. Lights are on, radio works! Took out my phone called my trusted mech MRZ.

Told him the symptoms and he straight away says it's the battery! I'm like that's weird because I still have all the accessories working. He then explains that volvo needs a fully charged healthy battery to start. If the car detects that the battery ain't juicy enough it will cut the power to the starter to protect it. So my only option is to jump start but from the same battery or bigger.

Lucky for me my neighbour who drives a passat was about to go for work and got him to defibrillate my car. And lucky enough I had a thick cable to the job.

A few pumps and she comes to life.

Just opposite my place there is at least 5 car service center which all of them sells battery so I headed that way but none of this shops had size DIN66.

So as usual I did some research and found out that bosch and gp is what I'm after.

I know a supplier which is in puchong so I headed there and they had it. But price ranging from RM300 - RM500.

So I opted for a maintenance free Bosch DIN66 with 1 year warrenty. In no time the battery was replaced it immediately I could see the difference when cranking the engine.

So with all juiced up I headed for work which I am so late.

Friday, January 3, 2014

More LED

So yes i know my moose is rather old today and in comparison with the new cars coming out of the factory today and the techhy stuff that's fitted in this newbies, definitely i cant compare.

So in making her feeling abit younger of trying to add abit more new era stuff if you may.
Ever since LED lighting became popular in the automotive industry i began being more fond of it as well.

I started by getting the H7 Xenon conversion kit and adding Phillips LED bulps to it as well.
I always see new cars fitted with DRL. Day Riding/Driving Lights in other words. This is actually popular or standard in countries that snow to help other driving looking at your car.

In Malaysia today its equally popular as well. Some cames standard or you can always purchase an after market one.

I could not help myself by getting a pair for my moose as well.


These are not branded and YES its from the motherland of imitation parts...China. Learning more about parts from China, i soon understood that even this "fake" stuff if you may have their grades as well and the quality aint that bad. So the above cost me a total of RM170 which is not that bad seeing the warranty that comes with it and the finishing of it. Just for your knowledge, a Phillips 4 LED would cost RM 550 :)


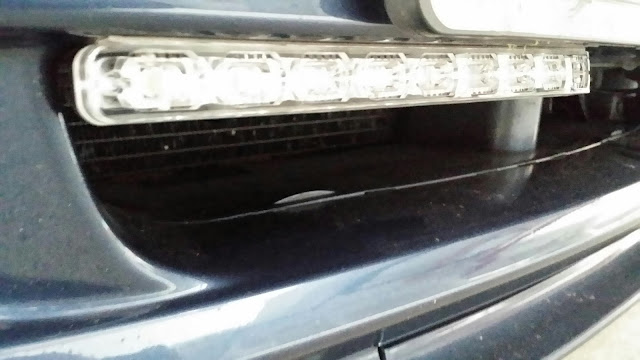
This DRL comes with 9 LEDs in a reflective enclosure which will generate better light quality. The quality of the LEDs as well are of good standards...good in a way that i go abit blind by looking directly into them for a few seconds. It comes with all the needed wires and sockets for easy fitment. No wires to cut or splice which i like.


Based on the length of the DRL, the only suitable place would be just below the number plate. My initial plan was to fit them just above or below the fog lights which is a bit tight and decided not to. Any other location would require cutting the bumper which of course im not happy about. 


After the fitment, they actually look awesome. Its not too high up that will glare onlookers, but does the job as well. They have been wired to the ACC power source, which means if the key is on the ACC position, it will lit up. Another way of doing this is to wire it up to your headlamps, but that means only when your lights are on they will come on as well.


End results are awesome...


So with this in ending year 2013...(the mod was done just a few days before new year)..hopefully 2014 will be really bright.... :)