Showing posts with label s40. Show all posts

Thursday, April 10, 2014

Volvo S40 BTCC

Volvo has always been active in the "racing" industry and has its name for producing really fast cars and not just safe. Most might think volvo are just cars for the old folks or a typical soccer mom, but only few knew the true potential of Volvo!

Volvo has been participating the British Touring Car Championship since ever since 1998. They started their flagship by using the 850r Estate. Imagine that, a typical wagon car that is tearing up the tarmac on the track. As they evolved, there was a point where they were using the S40 and wining the BTCC. Of course those S40 are T4 and mine is only a T3 but its the same base only different CC, Cylinders, and most importantly the T4 uses High Pressure Turbos and mine is just a low pressure turbo..well not for long at least.

Also not to mentioned they have dressed up the S40 stunningly sexy!!


Inspired by the decals on this BTCC model, i went ahead and ordered the 'S40' & 'Volvo' decal for myself. Tried my very best to interpret the size and font from this picture as closely as i could.


Now this is more of a trial actually to see the end results, so the quality on this decal are not he best but meant for some outdoor climate beating. 

Now what i should have done is gone to get a professional to get this on the car but i love DIY and this is just simple right..well not really. Ensuring that you follow the lines of the body is not easy heck its was hard! 

  
But after about a few hours, above is the end results...not too bad i would say. Does give 'i am not an uncle driving volvo' look to it.

Now if only the rims were bigger and the car was about an inch or so lower...then it would look and perform better at the curvy roads.

Double Layer Tinting

Not sure if its me or its just really hot these days. Since i was on a long leave (recovering from a motorbike accident), while having lunch i dropped by the accessory shop close by to my place just to check out on some things.

While i was there, few cars were getting their tint replaced for a better quality and darker ones as well. That is when it hit me, maybe another layer just to make it abit darker will improve the cabin temperature.

One thing went to another, and decided to go 70% darker on all 6 windows. Now i already have a very good tint stucked on it not too long ago, it was doing a good job, but due to its compliance of this country it only filters 50% of light. 50% might already sound like alot but in actually fact i feel almost all light goes through the screens.


This is what the 50% does...close to nothing right, just minor reflection

From the front...even in indoors you can see everything inside, imagine outside under the hot sun

Its a cheap tint where it only filters light, even so it claims to filter out alot more....

End results under the sun...ok i know this is abit too much

Sides, yeap its too dark..i know i know...but im loving it!! :)
After a few weeks of enjoying this deem cabin, i decided to remove the front piece. Most the light that comes in any car is actually from the front windscreen, not the sides or even the back. So by removing the front layer it allowed more light into the cabin and made the overall cabin brighter and not so catchy to the cops eyes.

Monday, January 20, 2014

Dip it baby...

Ever since i got the car, it always bugged me that the outer door panels looks a bite worn out, well to me its extremely warned out!

As you can see from the picture below how unhappy i am but what to do...the car has aged and the rubbers with Malaysia heat will not last. After a closer inspection, the rubbers are still doing its job but ecstatically my eyes is tearing blood!
Passenger triangle window
Passenger side
So after many, many and many sleepless nights, i thought i will give it a paint job. Sand it smooth and a nice coat of matte black. Obviously this is a cheaper solution. So first thing was to prep the car. Now with paint masking is very important otherwise all the over spray will be visible. 

Little did i know, masking is not easy! Its freaking hard, especially for a person like me who keeps peeling it off and doing it again, until its perfectly aligned. It took my close to 4 hours to mask just the rear passenger door. 1 door that is. I was tired and my back was killing me, so i called it a day and thought i will just finish it up next weekend. So the car was parked at my usual place protected from the nasty sun and rain, but one of the days, it had rained so bad with strong winds, and my whole car was wet!! Arghh which means all my masking with newspaper and masking tape is ruined!!! Had to feel all of them off, otherwise when wet newspaper dries up, it will be an even bigger mess to clean up the car.

So i thought there got to be a better solution. Recently this new rubberized based paint was getting very popular from US. PLASTI DIP! After watching numerous videos on YouTube, i thought to my self, this is for sure the tool for the job. Rubber for rubber. 

I headed on to ACE Hardware, got a minor heart attack to know that its RM 50 per can! Calmed down and still bought a tin.


So how it works is that this paint, once applied we can easily peel off the over spray so masking is not really required.. and i am a happy guy...below pictures will tell you more..


1st coat if im not mistaken

3rd or 4th coat

Close up look at the wet paint...yes its not a good job

5th and final coat

Final coat

You can see the difference between left and right, where on the right i have peeled off the over spray. It comes off beautifully but it is a bitch to peel

After hours of peeling it off

End results..not bad ehh..

End Results


Overall i think i did not a bad job, but i will need to redo it again sometime. Lesson here is for it to easily peel off you need to ensure the over spay is thick enough, which means i will need at least 2 cans and not 1. Also please mask off the areas where you do not want the paint to reach! I used about 40 minutes to paints the 5 layers, the waiting time in between was about 5 - 10 minutes, but it took me about 2 - 3 hours to peel off the over spray because they were all over and they were so thin that i had to rub it off!

But in a nut shell Plasti Dip is AWESOMEEEEE

Saturday, January 18, 2014

Out of juice

This happened about a week ago. The night before my place had no electric, but since I was dropped dead tired and thinking about my meeting the next day...I still slept like a baby.

Got up in the morning all fresh and ready for the job. Put on my well pressed shirt and pants, decided to drive as the bike just gets my clothes all crumpled, got down kept all my stuff in the car...and turn in the ignition but the car does not want to crank. I got panicked. Lights are on, radio works! Took out my phone called my trusted mech MRZ.

Told him the symptoms and he straight away says it's the battery! I'm like that's weird because I still have all the accessories working. He then explains that volvo needs a fully charged healthy battery to start. If the car detects that the battery ain't juicy enough it will cut the power to the starter to protect it. So my only option is to jump start but from the same battery or bigger.

Lucky for me my neighbour who drives a passat was about to go for work and got him to defibrillate my car. And lucky enough I had a thick cable to the job.

A few pumps and she comes to life.

Just opposite my place there is at least 5 car service center which all of them sells battery so I headed that way but none of this shops had size DIN66.

So as usual I did some research and found out that bosch and gp is what I'm after.

I know a supplier which is in puchong so I headed there and they had it. But price ranging from RM300 - RM500.

So I opted for a maintenance free Bosch DIN66 with 1 year warrenty. In no time the battery was replaced it immediately I could see the difference when cranking the engine.

So with all juiced up I headed for work which I am so late.

Friday, January 3, 2014

More LED

So yes i know my moose is rather old today and in comparison with the new cars coming out of the factory today and the techhy stuff that's fitted in this newbies, definitely i cant compare.

So in making her feeling abit younger of trying to add abit more new era stuff if you may.
Ever since LED lighting became popular in the automotive industry i began being more fond of it as well.

I started by getting the H7 Xenon conversion kit and adding Phillips LED bulps to it as well.
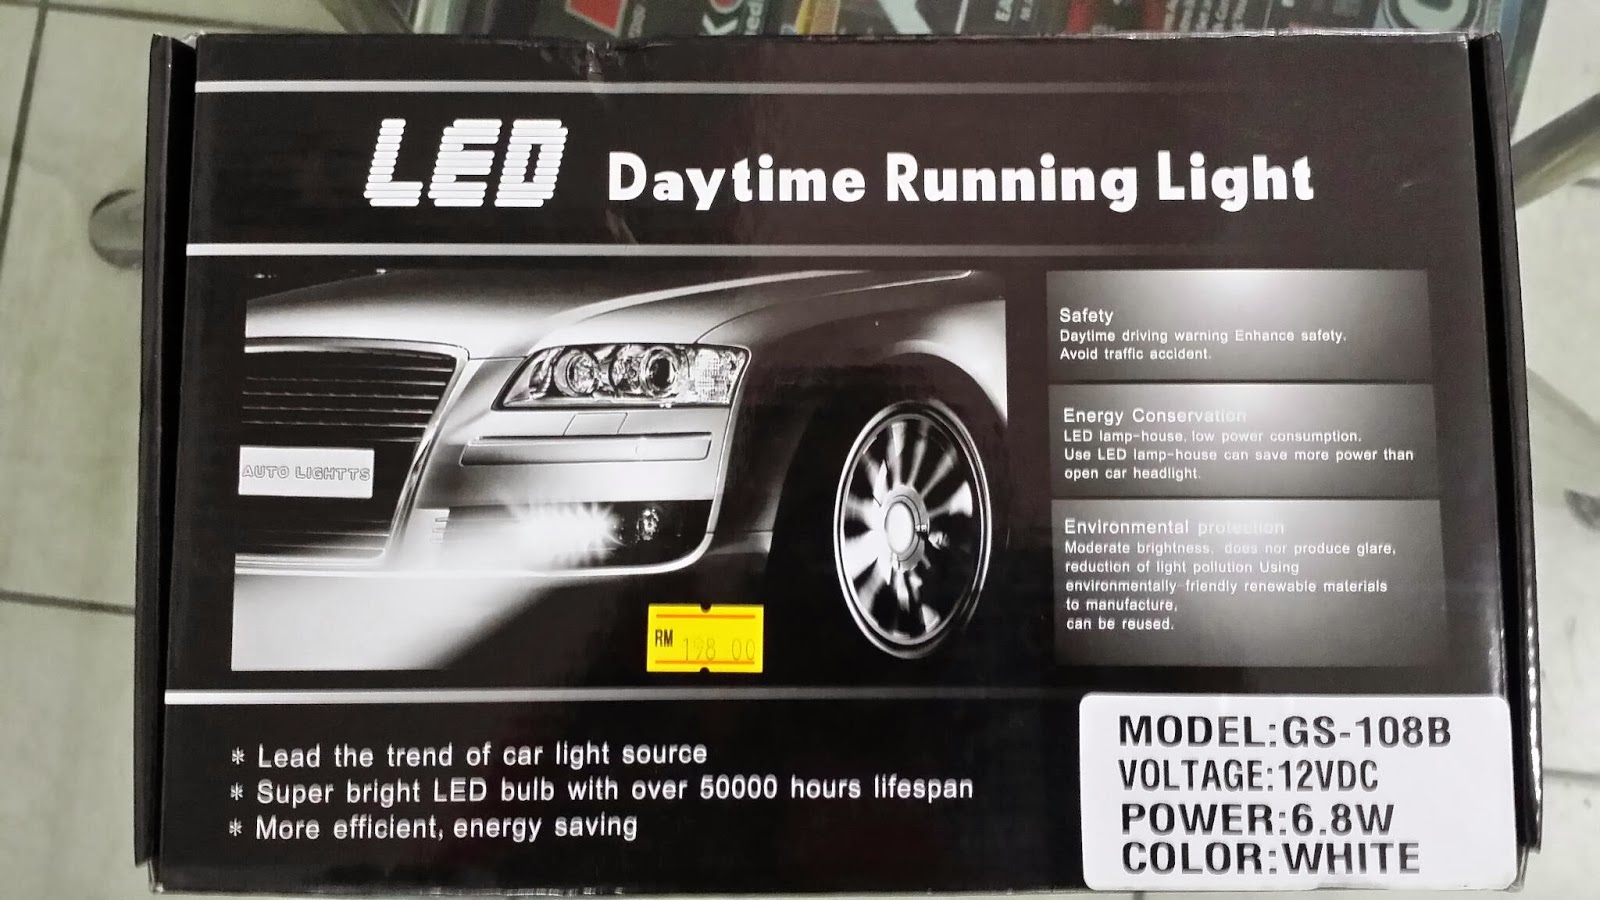
I always see new cars fitted with DRL. Day Riding/Driving Lights in other words. This is actually popular or standard in countries that snow to help other driving looking at your car.

In Malaysia today its equally popular as well. Some cames standard or you can always purchase an after market one.

I could not help myself by getting a pair for my moose as well.


These are not branded and YES its from the motherland of imitation parts...China. Learning more about parts from China, i soon understood that even this "fake" stuff if you may have their grades as well and the quality aint that bad. So the above cost me a total of RM170 which is not that bad seeing the warranty that comes with it and the finishing of it. Just for your knowledge, a Phillips 4 LED would cost RM 550 :)


This DRL comes with 9 LEDs in a reflective enclosure which will generate better light quality. The quality of the LEDs as well are of good standards...good in a way that i go abit blind by looking directly into them for a few seconds. It comes with all the needed wires and sockets for easy fitment. No wires to cut or splice which i like.


Based on the length of the DRL, the only suitable place would be just below the number plate. My initial plan was to fit them just above or below the fog lights which is a bit tight and decided not to. Any other location would require cutting the bumper which of course im not happy about. 


After the fitment, they actually look awesome. Its not too high up that will glare onlookers, but does the job as well. They have been wired to the ACC power source, which means if the key is on the ACC position, it will lit up. Another way of doing this is to wire it up to your headlamps, but that means only when your lights are on they will come on as well.


End results are awesome...


So with this in ending year 2013...(the mod was done just a few days before new year)..hopefully 2014 will be really bright.... :)

Wednesday, December 18, 2013

Tragic Accident !!!

As i mourn and write this post, a few days ago i over judge my cornering capability of my s40 and ended up with a tragic accident.

It was at night time and i was not under any influence but the influence of a hungry stomach as i was going to the local "Mamak" shop to pack some food.

As i took the corner i was confident that i could make it, but in less than a second my heart just stop beating. I was so shocked to have feel the impact. I knew this days will come but did not think it will be that night.

My first reaction was to immediately jump out the door to see the damage. It was bad, really bad. I just could not believe i scared her due to my missed judgement. 

Well a damage is a damage... 


Lesson learnt: Dont be hungry and think of food while driving.

Tuesday, December 17, 2013

S40 Wheel Bearings

During the purchase of this S40, i noticed that there is a slight noise coming from the rear wheels when entering corners, to the left only. After much digging under the car, we thought i could be some aged bushing.

Since that was the case, i never really gave much thought to it, just told myself that i will change all of them when im doing the suspensions.

During my last maintenance, (post about it is here) i had to do a full wheel re-alignment which made the same noise now permanent. This drove me mad, and after much of searching, its was the wheel bearing. In a way i was a bit please because it was not a major issue.

Called up the local volvo spareparts shop and to my shocking 1 wheel bearing cost freaking RM500..arghh plus labor its at least going to be RM550-600.

After a few rounds of my fingers dancing on the keyboard, research found that the Mitsubishi Evo 3/Waja also uses the same bearing... :)

This is thanks to the fact that they share the same chasis construction. Big smiles on my face, as this only means cheaper parts!

Fingers continued to dance to later find out that the ABS tooth thinggy that sits at the back of the bearings are different compared to the Volvo and Mitsu. Their gaps are different, and the way its assembly is not the same as well.

Volvo's one are bolted to the hub while the other is just slotted in. hmm...

So after some thoughts, i do not want to disturb the way the ABS works on the Volvo and decided to send the New Japan Bearing, which is bolted on to a new hub to the local machine shop to make 2 holes so that the ABS tooth thinggy can be bolted on. After an hour its done.


NTN Japan produces the best bearings apparently.


Notice the 2 bolts that have been added :)

This is before the extra 2 holes are made.
 All in i only spent RM 110 for the bearing and RM 80 for the labor and machine work. Total of RM190 and i am happy.

Next things to fix/do:

1. Front Lambda Sensor 
2. Steering Rack cover 
3. Belt Tensioner 
4. Service AC
5. Suspension
6. Bushing
7. All parts related to its arms and suspension
8. Rear passenger power window = RM 1 000 (Better find a used one from the halfcut shop)
9. Tint
10. Multimedia system
11. Rims + Tyre
12. Painting = RM 1500 +- (Hopefully 1 layer of paint will do the job)
13. AC fan
14. Rear wheel bearing
15. HID
16. LED Lights 

Thursday, October 24, 2013

Service of 120k km 24/08/2013

Kinda backdated but what the hell..a blog is a blog :)

Seeing my to do list was getting longer and longer this service i decided to knock off some items from it..

Here is the list

1. Castrol Fully Sys (lucky had balance from the old bottle so no need to buy 2 --> RM220
2. Volvo Original Oil Filter - RM 45
3. Steering Rack Cover (Driver Side) - RM 105
4. Toyota ATF (I was told its the best alternative) - RM 145
5. Drive Belt (Since i was changing the tensioner) - RM 195
6. Belt Tensioner - RM 275
7. Front O2 Sensor - RM 650

To reset CEL - RM 45
Labor - RM 180

And total burnt = RM 1860

on top of that an additional charge for using my card so in total = RM 1906
The charge of using the card to pay should actually be paid by the merchant legally but they are conveniently charging it to their customers..sigh

Post Service - Well the CEL came back on after some time with the same error so im really getting pissed off now with this issue. Starting to think this workshop is unable to solve this issue but more of trial and error arghh..

On top of that i had to do alignment for the front as the shocks were removed to help with installing the rack cover. Took it to a shop recommended by Wyn as well and did it for all 4 tires. The prize that i got now i there is a new noise coming from the rear of the car that sounds like bearing...and bingo it is bearing.

You would think that after spending so much of your hard earned $$$ to actually solve all the issues and make the car as perfect as possible but one by one it is testing me, hmm no worries i still can hold it together.

so now back to the list:

Next things to fix/do:

1. Front Lambda Sensor 
2. Steering Rack cover 
3. Belt Tensioner 
4. Service AC
5. Suspension
6. Bushing
7. All parts related to its arms and suspension
8. Rear passenger power window = RM 1 000 (Better find a used one from the halfcut shop)
9. Tint
10. Multimedia system
11. Rims + Tyre
12. Painting = RM 1500 +- (Hopefully 1 layer of paint will do the job)
13. AC fan
14. Rear wheel bearing
15. HID
16. LED Lights 

Item 13 & 14 is on priority and need to keep checking why the CEL keeps coming on..
 

Monday, June 3, 2013

Weekend Shootings...........

For the very first time i managed to give the car a personal hand wash by no other than me :)

As promised on my previous post i decided to take some photos but unfortunately i was only armed with a 5mp Samsung Galaxy with the help of Camera 360 on HDR. 

Introducing my Volvo S40 2.0 Turbo Phase 2.5.....


The puney snail

B4204T


Since this is the final Phase 2.5 of this model, its comes with Remus Exhaust..